Cleaning Up My Style 42 Wheels

img_6900.jpeg

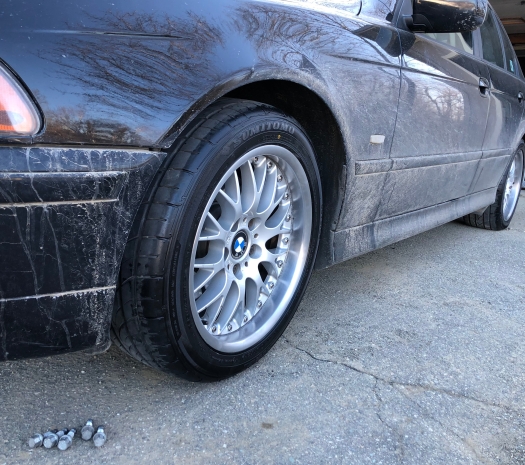
The clear paint on the Style 42 wheels on my E39 530i BMW is notorious for peeling off and exposing the metal underneath to pitting. This is because paint simply doesn’t like to stick to polished aluminum. Eventually, after much time has passed and many miles gone by, grime begins to make its way underneath the coat of paint.

Style 42 wheels are two-piece wheels. This means that the center can be separated from the “barrel” by undoing the many bolts holding them together. BBS, the manufacturer of these wheels, produces many two-piece wheels, such as the Style 5s used in the earlier E39 528i (only with the sport package). Unfortunately, even though the two-piece nature looks great, the gap between the two pieces allow crud to build up, and thus is where the pitting always begins. After that, the grime just works its way further out on the polished lip and eventually paint is flaking off the entire wheel.

IMG_6875
The paint had peeled off the once-polished lips and left behind a disgusting mess of pitted metal and brake dust–something I simply couldn’t bear to have in my face for another summer.

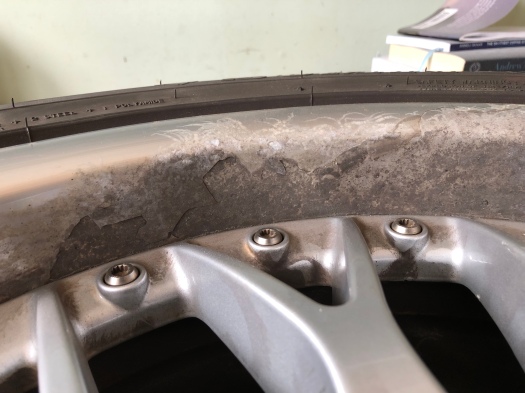
I began this project by using an old putty knife to scrape off all of the loose paint and dirt. I then took out a profile sander (I just used a flat attachment) and began sanding. The areas without paint were sanded to bare metal quickly, while the areas with non-peeled paint took much longer to sand through. I found that applying lots of pressure down on the sander helped to speed up the process, although it was pretty uncomfortable and tiresome. Unfortunately, I couldn’t get into the crack between the wheel center and the “barrel” and thus there is still some grime and old paint in the cracks.

I could have taken the wheels apart, but I heard that the bolts holding them together are often seized and can require the use of a torch to un-seize them. Obviously, I couldn’t use a torch while the tires were mounted, so I decided that I wouldn’t take the wheels apart. Also, these bolts are known for breaking inside the wheels, which is a major pain. And the bolts alone are very expensive and somewhat difficult to sort, so I would probably end up buying another Style 42 wheel to source the bolts from. Long story short, I decided it wouldn’t be worth the time and cost to take the wheels apart to get them cleaned up perfectly.

When I finished sanding the first wheel with the sander, I then changed to a smaller grit sand paper and began hand-sanding to make the abrasion marks all travel in the same direction. I then moved to a much smaller grit paper (1500 grit), which I could only find at an AutoZone. As I sanded with this paper, the metal became shinier and shinier.

I stopped using sand paper all together and began polishing the wheels with a metal polish and microfiber cloth. Eventually, I got the lips of the wheels pretty shiny.

Next, I took another microfiber cloth and wiped down the wheels to get any brake dust off. I then took them outside and sprayed some tire shine on the rubber to make it look even more appealing. As a final touch, I removed the center caps and used some Ultimate Black trim restorer to dye the gray plastic rings around the edges of the BMW roundels. I popped these into each of the wheels and the job was finally done.


IMG_6887
Pardon the dirty car–I went to the car wash the next day. As you can see, the lips are much better looking and finally have some shine to them again. Finally…

IMG_6910

E39 Clutch Delay Valve Delete

In the early 2000s, BMW implemented a “clutch delay valve” (CDV) or “clutch lock valve” in many of their models. In cars without this valve, the clutch fluid passes through the clutch line normally when you depress or let up on the clutch. Thus, the clutch performs exactly as your foot tells it to; if you dump the clutch, the pressure plate jumps onto the flywheel and off you go. However, on these BMWs with the CDV in place, the action of the clutch is damped. Basically, these valves have narrow openings for the hydraulic fluid to pass through. By narrowing the opening, they slow the rate at which the fluid will pass through the piping, thus slowing the action of the clutch. So, if you dump the clutch in one of these BMWs, the clutch will slip for a bit, as the action is slowed.

The idea behind these valves is to protect the drive train from shock and create a smoother drive. However, this only helps with people who are inexperienced with driving manual-transmission cars. For those who are experienced, the CDV can make smooth shifting more difficult, as you have much less control over the clutch action. Also, because the CDV allows for more clutch slippage, clutch life is considerably shortened. For this reason, many BMW enthusiasts will “delete” the CDV. I also decided to delete the CDV in my E39 BMW; hopefully my driving will become more smooth and not less, as the latter would be indicative of inexperience.

In my case, I bought a CDV-delete valve from Bavarian Autosport. On their website, they call this part an “unlock valve.” Basically, it has the same dimensions as the OEM part but has a larger interior diameter, thus allowing the fluid to pass through at a normal rate.

I jacked up the front of my car and placed my jack stands underneath. I left my jack on the center jack point just for extra safety in case the jack stands failed. I crawled under the car and located the CDV that I would be replacing. However, as I was trying to remove the old CDV from the clutch line and master cylinder, I snapped the clutch line. The threaded end of the clutch line had seized in the CDV, and thus when I put too much pressure on it, it snapped. Now, I am waiting on the replacement clutch line. I will post an update when I finish the job and a review of the CDV-delete.


Update: I finally got my E39 up and running again yesterday. With the snow storms we’ve been having recently, my package with the part I needed had been delayed. It got here yesterday and I installed it. To do this, there is a simple clip-mechanism that holds the hard part of the clutch line (the new part I had gotten) to the soft line. I undid this clip and attached the new part. Then, I installed the CDV-delete in the master cylinder. Finally, I attached the hard line to the CDV-delete.

Next, I had to bleed the clutch. I was a bit surprised to push down on the clutch pedal to find it had hardly any resistance, but I did lose a lot of fluid in the process. So, I ended up adding fluid, pumping the clutch, adding more fluid, pumping the clutch more, etc, until I began to feel some resistance at the end of the clutch travel. I kept doing this for a while until there was a normal-feeling amount of resistance. Next, I got a helper to pump the clutch ten times and then hold it down on the last pump, where I would open the bleed valve on the master cylinder and close it again before they released the clutch. The idea behind this is to purge any air from the system. If the helper releases the clutch when the valve is open, it can actually draw air back into the system. This is why it is important for the clutch to be held down while the valve is opened and closed. After doing this about six times, the clutch felt normal. It was time to take it for a spin.

As I drove out of the garage, I immediately felt a different in the clutch feel. It felt much sharper and more direct. Out on the road, it felt easier to modulate the clutch and starts were smoother. I tried a couple of launches as well; I couldn’t resist. Before deleting the CDV, when launching this car, I would often find myself slipping the clutch more than I had wanted to and the engine would rev too high. I don’t ever do hard launches, but just accelerating onto a big road quickly, I felt as if the clutch slipped too much. Now, after the CDV delete, the clutch slips much less and the car gets moving much more quickly.

So, in conclusion, this is a worthwhile mod. I’ve only driven a few miles since I deleted the CDV, but I can definitely feel the difference. I’m not sure of the logic behind having a CDV in the first place—BMW knew well enough not to install them in the M-cars, so why did they install them in the regular cars? Who knows, I’m just glad I deleted mine and am looking forward to testing it out more.

New Rear Struts in the E39

These are the new Bilstein struts that I installed. After I took this picture, I realized that the rear struts do not have built-in bump stops, so I added those.

I finally got around to replacing the rear struts on my E39 530i. After 136,000 miles, I knew they were worn, if not completely blown. It had been over a year since I replaced the front struts and I was excited to have done all four corners.

To do the rear struts in the E39, you first must remove the rear seats. This process entails removing the bottom seat cushion and the seat back. Underneath my seat was a collection of sticky, under-the-seat paraphernalia including ball point pens and lollipops.

After removing the rear seats, I then removed the interior C-pillar covers. I had to first pry out the interior lights from these pieces in order to access the fasteners.

It was now time to remove the rear parcel shelf, the second most difficult step of the job. To do this, you must first remove 4 pop-rivets that hold the front end of the parcel shelf in place. Then, you remove the three bolts in the middle of the shelf, which I believe are meant for anchoring child car seats. Finally, you crawl into the trunk and undo the three nuts holding the sunshade in place. This was my least favorite step, as the trunk is pretty tight and I am definitely claustrophobic. After undoing these bolts, I was able to remove the parcel shelf (with a bit of finessing).

I then detached the two outer seat belts, which wasn’t really necessary. Next, I unscrewed the two screws holding each of the rear speakers in place. Located under these speakers were the nuts holding the strut mounts in place. At this point, I took a few pictures:

The parcel shelf has been removed.
I am holding up the sound insulation so the strut mount attachment point can be viewed.


I then jacked up the rear of my car (don’t worry, I chocked the front wheels). I did this by placing my low-profile jack under the rear differential. I had rear mixed reviews of this method and decided to wad-up a microfiber cloth and place it on the jack pad to avoid damaging the diff housing. I found a flat spot on the housing and began lifting. I was able to get the car up and placed my jack stands at the two rear factory jack points. I removed the wheels and was ready to disassemble.

First, I removed the nuts attaching the strut mount to the car. I then removed the long bolts holding each of the struts into the wheel spindle. The struts dropped down and I had planned on removing them from the car at this point.

However, there was not enough clearance between the spring and the fender liner. So, I removed both of the fender liners. The fender liners were very sandy and most of that sand found its way into my hair, where it stayed for a long time. However, I still wasn’t able to get the strut out of the wheel well. On the passenger side, I ended up removing the fuel hose that goes to the filler cap and pulling it out of the way, as it blocked the strut from being removed. On the driver side, I removed the evaporative-tank-charcoal-canister-or-whatever-its-called from the wheel well. This allowed me to remove the second rear strut.

This is the fuel filler door with the fuel hose removed.
This is the driver side wheel well with the evaporation tank removed.


I switched over the springs from the old struts to the new Bilsteins and began the reassembly process, which was the reverse of disassembly. However, when I was reinstalling the rear parcel shelf, I wasn’t able to get the shelf to align fully and it seemed like it was getting stuck on something. That was when I realized that I had not installed the rear speakers correctly and this was preventing the shelf from being able to lay flat. After figuring this out, the rest of the reassembly process went smoothly.

I have been driving on the Bilsteins for a couple weeks now and the car feels much more solid than it did before the strut replacement. Prior to this job, when I hit bumps in the road, I would hear one thunk and the back end would just float along behind. Now, I hear two solid-sounding thunks and the car feels much more stable and feels more composed over these bumps. Living in Maine, there are always plenty of frost heaves to hit in the winter. I feel like I would be saving lots of money in suspension components if I lived in a warm climate, as I wouldn’t hear worn parts clunking over bumps as much and thus wouldn’t be driven insane until I replaced them. But who am I kidding? I wouldn’t give up my winter-parking-lot-drifting sessions for bump-less pavement!

Winter Storm Quinn-2018.

N52 Common Lifter Tick

The N52 6-cylinder engine in my mom’s E61 5-Series BMW wagon is notorious for suffering from a  hydraulic-valve-lifter tick. In modern BMW engines, hydraulic valve lifters are used to ensure that proper valve clearances between the valve and the cam follower are maintained. However, when these cars sit, the oil inside the hydraulic lifters can drain out. Thus, when the engine is started, there will not be proper oil pressure in the lifters and the engine will tick.

My mom’s E61 was produced in September of 2006. However, BMW updated the design of the engine head at a later date and included a check valve that maintained oil pressure in the valves when the engines are shut off. This fixed the ticking issue in many cars. This fix did cost BMW dealerships money, and individual lifters were often replaced before the head was replaced in a preliminary attempt to fix the problem.

Sadly, my mom’s car left its warranty behind many miles ago and will not be receiving a new engine head. For now, she’ll just have to play music over the ticking.

Another solution has been discovered by BMW’s dedicated enthusiast group: don’t drive like a grandma. By driving at a higher RPM, the engine oil circulates better and can help prevent the lifter tick. So, you can add this excuse to the notebook: “I’m sorry officer, I have to drive at six-thousand RPM because I am trying to fix a lifter tick. I’m sure you understand…”

E39: Thrust Arm Replacement

After my tie rod replacement, my E39 developed a shudder in the steering under light braking. I could also wiggle the left front wheel and hear a knocking sound in the suspension. Because worn thrust arm bushings are known for causing a steering-wheel “shimmy” under light braking and because I had already replaced my tie rods, I decided to replace these.

I ordered my new thrust arms from Bavarian Autosport in Turner, NH, where I get all of my BMW parts. The particular thrust arms I ordered were made by Meyle.

To replace the thrust arms, I jacked up the car and set it up on jack stands. I removed the wheel on the side I was working on. The thrust arms are attached to the subframe with a large bolt and a nut. I used an 18mm wrench and a 16mm socket to remove the bolt from the nut. However, I left the nut in place so the thrust arm would be held still for the next step: popping out the ball joint.

The new thrust arm is the least-dirty of the suspension parts in this photo.

I used the ball-joint-popped that I bought for my tie rod replacement to remove the outer ends of the thrust arms from the wheel carrier. To do this, I loosened the 22mm nut holding the thrust arm in place. I then put the joint popper on and cranked it down until the thrust arm popped out of the wheel carrier.

I then installed my new thrust arms in reverse order. The only issue I ran into was with the headlight-adjuster-level-sensor, which was attached to the passenger-side thrust arm with a terrible grimy little clip that must have been designed by an Audi engineer. This was the third time I had struggled with this clip, as re-attaching it is very difficult. However, once I got it back on, the rest of the job was smooth sailing.

Alignment

I recently replaced the tie rods in my E39 BMW 530i and needed an alignment. Badly. I had made an appointment for an alignment, but when I took the car there, I was told that they were not capable of aligning it. I am still unsure of why they told me this, but it had something to do with the steering angle sensor needing reprogramming.

I then decided I would take the car to the BMW Dealership for the alignment; a decision which, looking back on things, was not a great one. The closest BMW dealership is an hour and forty-five minutes away. However, I still made my appointment and drove to the dealership on that Thursday afternoon.

I got to the dealership and sat down to wait for the alignment to be completed. However, when the alignment was finished, my name was called and I went to meet with the service advisor. I was told that, due to a bent strut tower, the camber alignment was out of spec and the adjustment range was incapable of fixing this. I payed for the alignment and was ready for the long drive home.

However, the technician had rolled my window down. My driver-side window hadn’t been working about 85% of the time. When he went to roll the window back up after the alignment had been completed, it wouldn’t move. After trying multiple tactics, the window still would not roll up. Seeing as how the outside temperature was ~15°F, I wasn’t about to drive home with the window all the way down. Thus, my mom and I were rented a car.

We drove back to the dealership the next evening to pick up my car and drop off the rental. The window was up and I was charged for an hour of diagnosis and was told that the window switch module was likely the cause of the window not working. I was quoted $350 for the new module. Of course, I didn’t have the dealership replace this part.

When I got home, I went on the BMW forum and found somebody who was willing to sell me their E39 driver-side window switch module for $50. I received the module a few days later, installed it in three minutes, and my windows are working perfectly. My next job is fixing the bent strut towers, after which I may have to get another alignment… of course.

Thermostat

Saturday, November 11th: I had known for a few weeks that the thermostat housing in my E39 was leaking coolant. I could see areas of dried coolant itself on the plastic housing and small spots on the fan blades beneath the thermostat.

I am getting experienced with the front of my engine and the process of removing the fan shroud and fan clutch is becoming second nature. However, this doesn’t mean that it isn’t a pain, and it is. Once the fan shroud and fan clutch were out of the way, I quickly unclipped and unbolted the thermostat and replaced it with a new Behr unit.

I torqued down the bolts holding the new thermostat on and made sure everything was tight. I then put the fan clutch and shroud back into place, after which I bled the system. This was pretty easy, as I also had to do this when I removed my water pump shortly after I bought the car. All in all, a successful job that saved an unnecessary flatbed trip.

Another “ugh” story….

I was meeting up with a friend to work on a lab report for my AP Biology class at the Camden Public Library. When leaving, I drove up the street from the library, took a left, and a terrible noise suddenly began at the right front wheel in my E39.

I pulled over quickly and took a look at what could possibly be causing the terribly loud noise. Somebody waiting on the corner to pick up his kid from the school bus walked over to take a look. I couldn’t see anything wrong, so I drove about ten feet further, and the noise was terrible. Still not able to find a problem, I turned around and decided I would drive around the residential block before pulling out onto Route 1.

As a bit of a back story, I had previously noticed a rubbing sound from this wheel in cold or damp weather and assumed it was a failing wheel bearing. On the day I was returning from the library, I assumed that my wheel bearing may have been failing. As a result, I was strongly considering a tow at this point.

As I neared the end of a street, I decided to brake. While the brakes worked fine, the noise got twice as bad. At this point, it was a constant metal-on-metal shrieking sound. I pulled into a parking lot and decided I would call AAA.

Unfortunately, I had to go to tutoring at 4:30, and it was about 4:05 at this point. I called my mom, who promptly arrived and dropped me off at my appointment. She then called AAA and had my car towed back to our house (thanks). However, when the car was unloaded at my house, the noise was no longer existent.

Long story short, the noise had disappeared and was probably a rock. However, to be on the safe side, I used my mom’s car for the rest of the week, which was pretty nice because it has a heated steering wheel that mine lacks. On Friday, I went to inspect the problem, and lo and behold, my battery was dead. As a doornail. None of the dash lights came on. Nothing.

I optimistically tried to roll-start the thing all the way down our hill (which is very long) by gathering the speed in neutral and popping the clutch. Nothing worked. I ended up calling AAA again, but just for a jump this time. It was the same guy who had towed the car four days previously! The car came back to life, but required two jumper packs for enough juice. I drove it around the block and everything worked well. I also bought a battery tender, as the car would sit for another four days, and I didn’t want anymore problems.

Long story short, the noise from the wheel is completely gone. Whatever it was, it is not my problem anymore. And my battery is charged too–I think I am the winner in this situation.

Tie-Rod Troubles

Today was the day I had marked in my mental calendar as the day I would replace the tie rods in my E39 530i BMW. My steering was vague and the car wandered all over the road. Over bumps, it would pull violently to one side or the other, always to the side opposite the one I had been anticipating. Today I would replace the tie rods and on Wednesday I would get an alignment and have BMW-perfect steering and handling again. However, it seems I may have gotten a bit ahead of myself.

As it turned out, I did not end up replacing the tie rods today. However, I ended my unsuccessful day of work on the car with a fit and by throwing my new vice-grips as hard as I could against the wall of the garage. Unfortunately for my anger levels, the vice-grips bounced off the cement wall and completed their journey in the bottom of the recycling bin full of returnables. I had to take a moment to breathe before going to fish them out. As you can tell, I had gone past both the ‘irritated’ and ‘angry’ thresholds and was now entering the ‘furiously breaking things’ stage. Let me explain why…

I had removed my old tie rod from the diver side of the car. This by itself was a little bit of a pain, as the Allen–fitting on the spindle-side of the tie rod had begun stripping. However, I drove to the hardware store in my mom’s car and bought myself the pair of vice-grips that I later used to throw against the wall of the garage. Luckily, these worked as a means to remove the end of the tie rod from the spindle. It was now time to put the new tie rods in. This is where the problems began.

When I tried to thread the new tie-rods back into the steering rack, I realized that the inner ball-joint wouldn’t move. Later, I found out it would but only if I wailed on it with a rubber mallet. Unfortunately, this is what led to my throwing-of-the-vice-grips-into-the-returnables-bin. I tried jacking up the suspension on that side of the car to get the control arms out of my way so I could rotate the whole tie rod assembly to thread it into the rack but nothing worked. So, I figured throwing my vice-grips would solve my problems. It didn’t.

So, I’m going to sign off today by saying that I did not finish; that the tie-rods won for today. However, I will not surrender and will make an update when I finish the job. See you then…

Update: I’ve finished installing my new tie-rods. I was very frustrated and finally decided I was just going to force the damn things in. So, I put a cloth on my jack and jacked up the driver side suspension by the brake rotors. I aligned the tie-rod with the end of the steering rack and cranked the wheel so it was held in place. I then proceeded to turn the inner tie-rod end slowly and whacked it with my rubber mallet constantly to prevent it getting out of alignment with the steering rack. After about ten minutes, I finally got the tie-rod in and attached.

I then repeated the same steps on the other side. However, I realized, after about twenty minutes of turning the tie rod end slowly to no avail, I had been turning it in the wrong direction. I switched directions and got it tightened up in less than five minutes.

Next, I did my best attempt at alignment, although it obviously wasn’t my best attempt, as I found the car to be hardly drivable when I took it out. I brought it back in, increased the toe-out on the passenger side, and took it for another spin. This time, it was almost perfect. Still, as soon as I finish this post, I will be heading to the shop and getting a professional alignment.

Unfortunately, I still have a clunking sound in my steering. This warrants further investigation, but I’m worried I might be face-to-face with a worn-out rack and pinion. While this isn’y common in 6-cylinder E39s at only one-hundred thirty thousand miles, it looks like it might be the culprit.

Thoughts on the Porsche 996 Turbo

I’ve been doing a lot of thinking recently. Some of that has been about schoolwork, but, to be fair, probably 60% of it has been about Porsches. Firstly, I must get out of the way that the word ‘Porsche’ is pronounced PORSH-UH, not PORSH. They are high-performance sports cars, meant for oversteer and setting lap records at the Nurburgring, not roof-covered platforms attached to your house upon which you spend summer evenings reading the paper and discussing the ugly color of roofing shingles your new neighbor chose when restoring that 1878 Cape that is nice enough but definitely not worth the amount that is being put into restoring it. Sorry, but I am passionate about this. Say what you want about how ‘horse’ is not pronounced as HORS-UH, but I will never move to the dark side. Now that this confusion is cleared up, I can tell you what been thinking about recently.

Specifically, I have been thinking about the 911. Well, specifically the turbocharged version. Or should I say, twin-turbocharged. I think you get the idea. Basically, I am trying to come up with ways to afford one of these while at the same time am simply perusing carsforsale.com to see what is available.

Before we get too deep into my thoughts, I should explain a few things. Firstly, used Porsches are not expensive. For example, there are plenty 996-generation 911 Turbos for sale for under fifty-thousand dollars (in fact, almost all of them are less than this price, with some even under forty-thousand dollars). If somebody were look at me with a stern expression and ask how I view a fifty-thousand dollar car as inexpensive, I would respond with this statement: firstly, a Porsche is a high-performance sports car. If I told you that the fifty-thousand dollar car would do 200 miles per hour with a modest tune, would those people change their views? Probably not, as they may still not get how ULTIMATELY GREAT the 911 Turbo is, but that doesn’t matter. If you want the real reason why the 911 Turbo should be considered a bargain, simply look at the competition. If you look to Ferrari as an example, I can guarantee you that the fifty-thousand dollar Porsche will outperform the Ferrari. This is partly because finding a Ferrari for under seventy-thousand dollars would be close to impossible, but also because the 996 Turbo will perform just as well if not better. And don’t get started on maintenance costs of Ferraris. A Porsche 911, on the other hand, can be used every day to commute, can be driven in the snow (the Turbos are all-wheel-drive), and you can do most of the work yourself! Plus, Porsches are reliable. The same cannot be said of Ferrari. The opposite is true for any of the competition, although the competition is more expensive and doesn’t perform as well, so I think you get my point. Now that you’ve accepted this logic, now I can make you swallow your tongue by saying that a regular, non-turbo 996 911 (probably a Carrera 2) can be picked up, in good shape, for under twenty-thousand dollars. Unfortunately, I will have to save that for a other time, as we are here to talk about the Turbo, and only the Turbo.

Okay, I will discuss the non-turbo 911s for a moment, but only to help strengthen my argument why the 911 Turbo is so great. The regular, non-turbocharged engines are known for bearing problems. While I believe that the problem is blown out of scale and is much less common than it appears in the online community, there are many documented engine failures as a result of spun bearings. However, the turbocharged engine in the Turbo models is derived from the engine used in the GT1 racer and the 996 GT3, and has no bearing problems. According to MANY sources not cited here, I’ve read that the engine in the 996 Turbo is essentially a race engine, minus the dry-sump lubrication system. To avoid anxiety of engine failure alone, the 996 Turbo is worth it ahead of the regular Carrera models. After all, the cost to replace a Carrera engine is probably close to the additional cost to buy the Turbo (although there are much cheaper solutions than engine replacement). Also, you get a huge “bimp” (as Peter Sellers would say) in performance and better looks! A win-win if you ask me. However, I will advise against asking your wallet, as it may disagree with the extra thirty-thousand dollars the Turbo costs over the Carrera, although it doesn’t matter because… Turbo.

To give some statistics, a 2004 (996-generation) 911 Turbo produces 415 horsepower and 415 ft-lbs of torque. Quite an amount by my standards, especially for a little car like the 996 Turbo. With a simple tune, that number can be over 500 for both figures. Who needs more than 500 horsepower? And who needs to go over 200 miles per hour? I think I am quite content at 200mph, thank you very much.

What about an older Turbo, you say? Well, the 996-generation 911 was the first water-cooled 911 produced by Porsche. Prior to the 996, the 993 Turbo was air-cooled. For this reason, the 993s are much more desirable to enthusiasts, as they view a lack of a cooling system as a definitive characteristic of a Porsche 911. For this reason, a regular 993 Carrera will cost much more than a 996 Turbo. A 993 Turbo will be over $150k. If you go later than the 996 and look at the 997, the Turbo models are also more expensive (at least $20k more). While many people say the 997 is more refined, I have also that the driving experience of the 997 is less involving. And who wants a Porsche 911 that is less involving to drive? And more expensive? I think I’ll stick to the 996 Turbo. Well, it $20k was of no objective to me, I would definitely and whole-heartedly buy the 997 Turbo instead, but unfortunately, I am in no position to be thinking of buying any other car, much less a twin-turbocharged Porsche 911.

I think I have outlined why the 911 Turbo is great. Why the Turbo is the best car in the world. There, I said it. “The best car in the world.” And specifically, the 996-generation gives you the best bang for the buck. Now, how in the world am I going to come up with $50k in the next month…